

From a Rubber Mold to a Finished Piece of Pearl Jewelry
The majority of the jewelry you see in the retail market is made using rubber molds. A rubber mold is what jewelers and jewelry manufacturers usually use to duplicate a piece of jewelry. The original piece of jewelry that is to be duplicated, would have been carved by hand, or created using computer-aided design (CAD) software and computer-aided manufacturing (CAM), like a 3D wax printer. We are proud to be able to say that the vast majority of Pearl Paradise’s jewelry (if not all), was originally carved by hand. There is a tangible difference between jewelry that is hand-carved by an artisan, and jewelry that is created on a computer by a technician. While hand-carved jewelry may not be mathematically perfect, the contours tend to feel softer and more fluid, while jewelry created using a computer seems to have a cold and more mechanical feel to it.
My name is John, and I started hand-carving wax models for jewelry, casting and making rubber molds 20 years ago. Over the years, I’ve created an extensive assortment of designs that I’ve captured and added to my rubber mold collection. When I joined Pearl Paradise, I brought over 3000 rubber molds with me. Today, on a daily basis, Hisano and I go through these rubber molds to hand-select which designs can be modified, if needed, to hold a pearl to add to Pearl Paradise’s online collection. After we select a design which we want to add to the collection, and make any necessary alterations, we then begin the process of creating jewelry from a rubber mold.
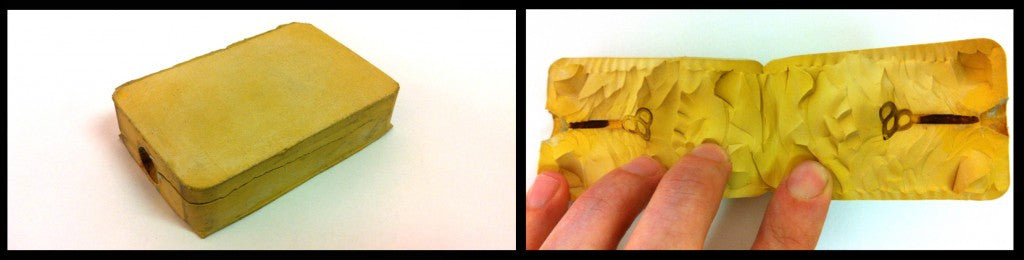
Above is a typical rubber mold. It was made with a device called a vulcanizer, which compresses and heats several layers of a special type of soft rubber, inside of which, the piece of jewelry you want to recreate is placed. The compressing effect of the vulcanizer squeezes the rubber around and into the crevices of the jewelry, capturing all of its details. The heating first makes the rubber soft, allowing it to flow seamlessly around the jewelry, and then the heat vulcanizes the mold rubber, making it firm. The mold is then hand-cut open to remove the original piece of jewelry. What is left is a three dimensional impression, ready for wax to be injected.
Step One: Injecting wax into the rubber mold.

Doing this step correctly is crucial to having your finished piece of turn out properly. The two key factors are wax temperature and air pressure. If the wax isn't heated to an adequate temperature, it won’t flow correctly and will not completely fill the rubber mold. If the wax is too hot, it can create air bubbles, which result in your finished piece having porosity.

The melted wax inside of the wax injector is pressurized to force it into the rubber mold. If the pressure is too low, the liquid wax will not flow correctly and will not completely fill the rubber mold, similar to when the wax is too cold. [This is shown with the wax on the left.]
Conversely, if the air pressure is too high, it could result in visible mold lines and/or “flashing”. Flashing is when wax overflows the rubber mold's design, resulting in extra wax on the injected wax model. [This is shown with the wax in the middle.]
When all of the variables are correct, the result is an injected wax model that is an exact duplicate of the original piece of jewelry. [This is shown with the wax on the right.]
Step Two: Sprue and invest the wax model.
In the photos of the wax injections, you can see a wax stick attached to the jewelry model. This is what is called the sprue. The sprue is basically the pathway for the liquid wax to get from the outside of the rubber mold, to the impression of the jewelry design in the center. Casting the piece in gold or silver is essentially the same process, but with different materials. Instead of injecting liquid wax into a rubber mold, you pour molten gold or silver into a plaster mold.

The first step in this part of the process is to attach the sprue of the wax model onto a rubber sprue-base.
You then slide a metal cylinder, referred to as a flask, over your wax model and onto the sprue-base forming a tight seal.
The next step is to mix a very fine plaster, called investment, and pour it into the flask. Before and after you pour the mixed investment, you have to put the mixture into a vacuum chamber which pulls all of the tiny air bubbles out of the mixture, and off of the wax model. If you left the bubbles in the investment mixture, your casting would have tiny metal bubbles attached to it where the bubbles were touching the wax model.
After the plaster solidifies, you gently pull off the rubber sprue-base, giving you access to the end of the sprue.
Step Three: Casting the piece of jewelry.

You’re now ready to put the flask into the casting furnace to harden the plaster and “burn out” the wax model, leaving an empty cavity that is the exact shape of the wax model. After all of the wax has burned out, and while the flask is still hot (between 800-1200 degrees Fahrenheit -depending on the metal and the design), you pour in your molten gold or silver into the hole where the end of the sprue was once visible. You always have to pour more metal than you need for the piece of jewelry you are casting. This is because the extra metal pushes the primary metal into the empty cavity where the wax model was, filling all of the fine details completely. The glowing metal you can see in the photo is referred to as the “button”.
Step Four: Cleaning and polishing the casting
After the flask cools for a little while, you submerge it in water, or “quench” it. This rapid cooling hardens the metal making it more durable and easier to work with. The rapid cooling also makes the plaster break away from the cast piece of jewelry in the center, referred to as the casting. After you clean off any remaining plaster, you cut your casting off of the metal sprue. If done correctly, your casting will have the exact same shape as your original wax model.

Your casting is now ready to be tumbled clean, then filed and sanded into shape. Your next step would be to solder together the components if needed, in my case, the bezel and post are attached to the top of the pendant with the jump-ring. After the piece is assembled, you would then set the diamond. Finally, the piece is ready to be polished.

Not done yet! Now my favorite part… Selecting the pearl!!!
Step Five: Setting the pearl.
After the pearl is selected, it is drilled and attached to the mounting and …
We are currently creating a minimum of 12 new pearl pieces per month, one of which is posted weekly on Facebook for our "First Look Friday" promotion - One New Pearl Jewelry Design a Week.
I really hope you all enjoy the new pieces as they are produced!


I love the simple pair of south sea drop earrings but the have a diamond in. Could I get them without the diamond please?
An obligation of appreciation is all together for sharing the information. I like to share a Collection of Sustainable Design named Collartz by Lidia Pitzalis, Jewelry, made by Artists from wherever all through the world. This Necklace shop presents Lava Rossa, the most revered and marvelous Design of our whole Collection. It is delivered utilizing Lava pearls which are taken from underneath Etna spring of spouting magma.
enjoyed the product production
My best friend and I were talking about pearls so I decided to google about them based on the fact that she knew someone that did pearl parties. It sounded odd but upon trying to find out more I stumbled upon the site and this detailed post about how molds are use. Very well written and easy to understand. I’m definitely amazed and now want a strand of pearls or an original setting! Thank you for taking the time to explain how you do what you do.
This is a great article. I have always loved jewelry and have even worked with goldsmiths to create my own custom designs for gifts, etc. It is interesting to see how the pieces are made. Thanks for sharing this!
Leave a comment